Building a Game With TypeScript. Pathfinding and Movement 1/7. Introduction
Chapter VI in the series of tutorials on how to build a game from scratch with TypeScript and native browser APIs
- Greg Solo
- GameDev
- July 17 2022
- Share on LinkedIn
North america vector created by freepik - www.freepik.com
Hello there, reader! Welcome to the first installment of Chapter VI “Pathfinding and Movement”. Last time we spent an entire chapter crafting our own Input System. We did that to ensure we have a simple but powerful way to react to user interactions with our game. Having this in place we removed the final roadblock that lay between us and made our game look like… a game.
Indeed, all this time we were making preparations, discussing architecture, covered the code with tests. But from the Player's perspective, there is nothing to do here at all. In this Chapter, we finally (finally!) start to make our game feel like a game. And we will do this by allowing Ships to find their path and move along it.
If you are looking to brush up on previous Chapters of this series before we begin, you can find them here:
- Introduction
- Chapter I. Entities and Components
- Chapter II. Game loop (Part 1, Part 2)
- Chapter III. Drawing Grid (Part 1, Part 2, Part 3, Part 4, Part 5)
- Chapter IV. Ships (Part 1, Part 2, Part 3, Part 4)
- Chapter V. Input system (Part 1, Part 2,Part 3)
- Chapter VI. Pathfinding and Movement (Part 1, Part 2, Part 3, Part 4, Part 5, Part 6, Part 7)
- Chapter VII. State Machina
- Chapter VII. Attack System: Health and Damage
- Chapter IX. Winning and Losing the Game
- Chapter X. Enemy AI
Feel free to switch to the
input-3branch of the repository. It contains the working result of the previous posts and is a great starting point for this one.
Table of Contents
- Introduction
- Locomotion Rules
- Node Debug Tools
- Vector2D Upgrade
- Conclusion
Locomotion Rules
The goal of our game is to destroy all opponents’ Ships. To achieve this we must ensure Ships can travel along the board: they should be able to advance and retreat. They are dynamic entities like real Ships or soldiers, not static entities like turrets. They have to move to perform their operation.
This is great but what exactly do we mean by “movement”? If you recall, in the last installment of Chapter IV: “Ship and Locomotion"we agreed to use term “Locomotion” instead of “Movement” to avoid confusion between “making a move” as a term used in turn-based games, and a “movement” as changing position in time.
Every game has rules, and our game is not an exception. First, let’s set up a few ground rules regarding Ship locomotion:
- “Locomotion” means the Ship changes its position on the screen from the center of the current Node to the center of the target Node
- Player can choose the target Node by clicking on a vacant Node
- Ship can relocate only to the “nearest” Nodes
- Locomotion happens per-Node basis (see gif)
- Player can move only one Ship at a turn
- Locomotion may happen at any time during the Player’s turn if the currently active Ship hasn't moved yet
Please note, that these are rules of this game, they are not universally true. For example, in some games, you can allow players to relocate all their ships during their turn. Other games may not be even turn-based so there is no restriction on when players can relocate their Ships. Now, let’s talk about every rule in depth.
“Locomotion” means Ship changes its position on the screen from the center of the current Node to the center of the target Node
What does it mean? Ships are not “floating” freely on the board. They have to be attached to a Node, and that Node is a “position” of a Ship. From the Canvas perspective, we draw the Ship at the center of the Node. We already established all that in “Ship and Locomotion” post, by defining ShipLocomotionComponent and setting up public getter Position:
// src/ship/components/locomotion/locomotion.ts
    export class ShipLocomotionComponent implements IComponent {
      // ... //
      public get Position(): Vector2D | null {
        return this.Node ? this.Node.Center : null
      }
      // ... //
    }
The important takeaway is that Ship, at any moment in time “stands on” some Node. There is an interesting caveat to that: how should we treat the interim when the Ship relocates between Nodes? We will discuss this, of course, in this Chapter.
Player can choose the target Node by clicking on a vacant Node
We build an entire Input system for this: to give players a way to command Ships. When the Player clicks vacant Node (that is, Node that has no Ship on it), the Ship must start moving towards that target Node. One thing we should keep in mind: at a given moment only one Ship can move. So, we have to keep track of currently active Ship to know which one of them has to start locomotion. This brings us to the notion of an “Active” Ship and it is mostly out of the scope of this Chapter. We will talk about this in the future when we start designing our State Machine. For now, all we care about is that at some point we need to “activate” the Ship and we will reduce the size of the fleet to just one Ship to keep things simple:
// src/settings/settings.ts
    // ... //
    export const Settings = Object.freeze({
      // ... //
      ships: {
         fleetSize: 1, // <--- CHANGE
         // ... //
      }
      // ... //
    })
Ship can relocate only to the “nearest” Nodes
We could allow Ships to be infinitely fast and move all around the board. But it would be much more interesting to allow them to move only in a specific range. That way in the future we can introduce different types of attack (melee vs mid-range vs distant) or even allow players to modify Ships and increase the range. Or we can introduce different types of Ships that have different specs (like heavy armored but slow Ships vs vulnerable but fast ones). Possibilities are endless. To achieve this we need a notion of “range”, an indicator that shows if Node is close enough to be considered for locomotion. If Node is not nearby the active Ship, clicking on it should be disregarded. Of course, we must present this range to the Players otherwise it will be confusing for them. Take a look at the gif one more time, darker Nodes are indicated to be in the range of the active Ship:
Locomotion happens per-Node basis
Locomotion horizontally and vertically is easy. We can just progressively move Ship along the line:
But what about diagonal? Again, Ships do not float freely in our game. They move along the Grid. Let's agree then, that diagonal movement does not happen “directly” but per-Node:
Without this rule, we could allow Ships to move along a straight line but this is not something we want:
Player can move only one Ship at a turn and “Locomotion may happen at any time during Player’s turn if currently, active Ship did not move yet”
These two have more to do with State machines we will talk about in the next Chapters. What is important for us today is that we should activate Ship only once. At least until we have a notion of the “turn”, which is again, the topic of the future.
Now, when we have game rules set up, we can think about technical implementations. And there is a lot to think about:
- how can we determine if the Node is in range of the Ship relocation?
- how can we activate the Ship? And when should this happen?
- after the Player clicks desired Node (assuming it is in range), how can we determine the path to that target Node?
- how can we handle drawing and animation of the locomotion?
These are all big questions and we will progressively address them, step-by-step. But before we jump into this we should make some preparations.
Node Debug Tools
If you had a chance to work on the front-end side of web development, you probably relied heavily on debug tools. They are indispensable to understanding what happens with your application. For example, you could use it to analyze the DOM tree.
Unfortunately for us, Canvas does not preserve information about what elements it draws. In fact, it does not have a notion of elements, it operates primitives like lines, triangles, and colors. If you recall, this was one of the reasons why we introduced our own Nodes, Grid: to have containers for this information. We also have the Canvas class that is responsible for actual drawing via native browser APIs. But we still lack any debug tools. Chrome DevTools designed to work with DOM are of no help for us here. So, we need to set up something of our own.
It should not be hard. What we need is a visual aid for the Nodes: let’s display their Index, which will help us a lot when we start digging into pathfinding.
We start by upgrading how Nodes are drawn:
// src/node/components/draw/draw.ts
    // ... //
    export class NodeDrawComponent implements IComponent {
      // ... //
      public Update(deltaTime: number): void {
         this.Clear()
         this.Draw()
         this.DrawDebugInfo() // <--- ADD
       }
      // ... //
      // --- ADD --- //
      private DrawDebugInfo(): void {}
      // --- ADD --- //
    }
If you recall, we draw every frame, since plenty of stuff can change since the last one. It should be of no surprise that we will draw our debug information on every frame too.
What do we want to draw? A simple text that displays an index of this particular Node, somewhere in the corner so it won’t distract us. The problem, however, is that our little rendering engine does not support drawing text. Why not fix this overlook?
First, let’s go the good-old TDD route and set a simple test for this new functionality:
// src/utils/canvas/canvas.spec.ts
    // ... //
    describe('>>> Canvas', () => {
      // ... //
      describe('>> API', () => {
        // ... //
        it('should set css style', () => {
          // ... //
        })

        // --- ADD --- //
        it('should draw the text', () => { })
        // --- ADD --- //

        describe('>>> calculate local point by global', () => {
           // ... //
        })
      })
    })
As before, we can simply spy on the native browser’s API, in this case, its fillText method:
// src/utils/canvas/canvas.spec.ts
    // ... //
    describe('>>> Canvas', () => {
      // ... //
      describe('>> API', () => {
        // ... //
        it('should draw the text', () => {
          // --- ADD --- //
          const spy = jest.spyOn(canvas.Context, 'fillText')

          expect(spy).not.toBeCalled()
          // --- ADD --- //
        })

        // ... //
      })
    })
And then verify that it was indeed called with proper arguments:
// src/utils/canvas/canvas.spec.ts
    // ... //
    describe('>>> Canvas', () => {
      // ... //
      describe('>> API', () => {
        // ... //
        it('should draw the text', () => {
          // --- ADD --- //
          const text = 'text'
          const position = new Vector2D(0, 0)
          const color = new Color(255, 10, 20, 1)
    	  // --- ADD --- //

          const spy = jest.spyOn(canvas.Context, 'fillText')

          expect(spy).not.toBeCalled()

          // --- ADD --- //
          canvas.DrawText(text, position, color)

          expect(spy).toBeCalledWith(text, position.x, position.y)
          // --- ADD --- //
        })

    	// ... //
      })
    })
Great, now to the actual functionality:
// src/utils/canvas/canvas.ts
    // ... //
    export class Canvas implements IAwake {
      // ... //
      public DrawText(): void {}
    }
Nothing fancy here, we just want to draw a text:
// src/utils/canvas/canvas.ts
    // ... //
    export class Canvas implements IAwake {
      // ... //
      public DrawText(
        text: string,
        position: Vector2D,
        color: Color = new Color(255, 255, 255, 1),
        fontSize = 14,
        font = 'Arial'
      ): void {
        this._ctx.font = `${fontSize}px ${font}`
        this._ctx.fillStyle = color.AsString()
        this._ctx.fillText(text, position.x, position.y)
      }}
Here we once again utilize helpers we created before: Vector2D to determine the position of the text and Color to determine its… well, color.
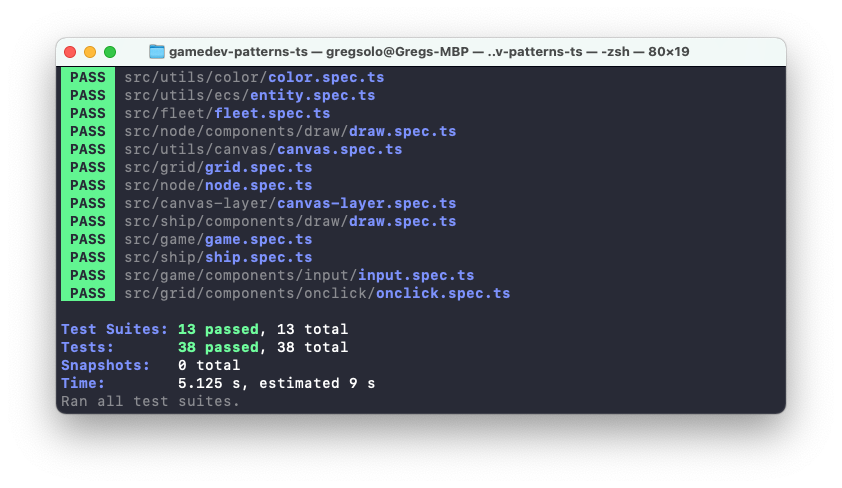
At this point, our code should successfully compile with npm start and all tests should pass with npm t:
Now, we can utilize DrawText within our debug tool:
// src/node/components/draw/draw.ts
    import { IComponent, Color } from '@/utils' // <--- CHANGE
    // ... //
    export class NodeDrawComponent implements IComponent {
      // ... //
      private DrawDebugInfo(): void {
        // --- ADD --- //
        const entity = this.Entity
        CanvasLayer.Background.DrawText(
           `${entity.Index.x}, ${entity.Index.y}`,
           entity.Start,
           new Color(255, 0, 0, 1)
         )}
        // --- ADD --- //
      }
    }
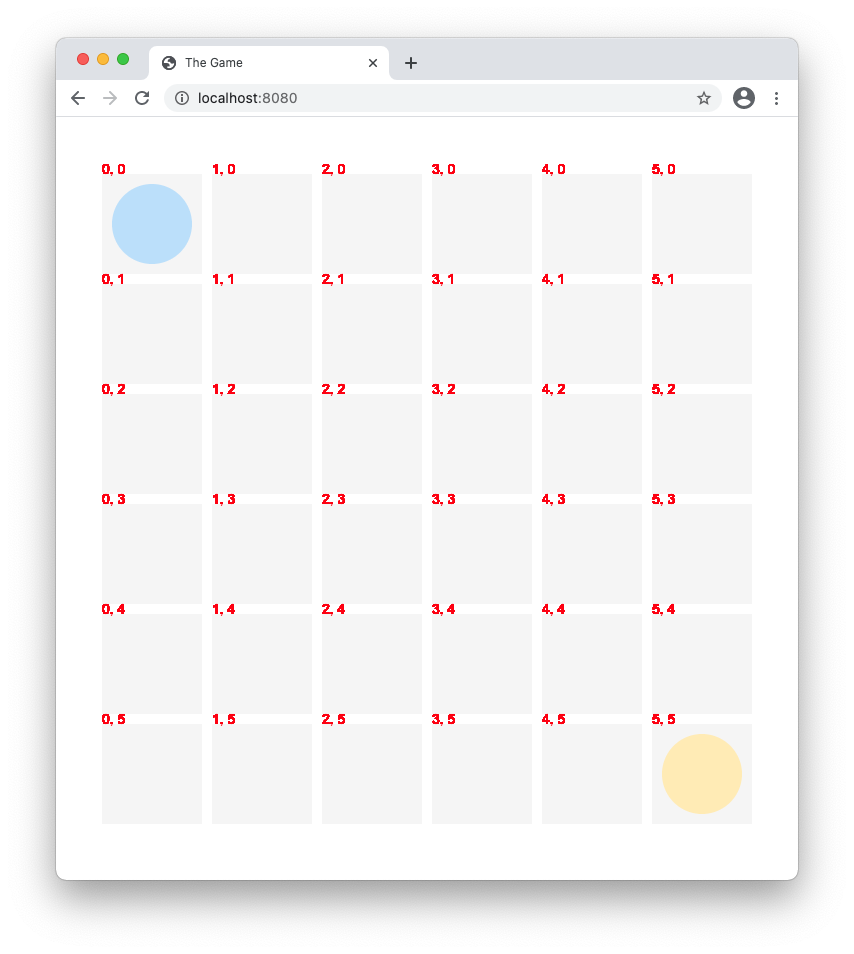
Here we draw Index on top of the Node with nasty red color and we have a clear visual indication of which Node is where:
Awesome! We will continue extending our debug tool with more information in the future, but for now, let’s make a few simple improvements. First, we don’t want to present debug information to our players. It's for us only, for our internal investigation, it's not meant to be seen by everyone. Let's provide a dedicated “mode” in which debug information is presented:
// src/settings/settings.ts
    // ... //
    export const Settings = Object.freeze({
     // ... //
     debugMode: true
    })
And only if the game runs in this Mode shall we render debug info:
// src/node/components/draw/draw.ts
    // ... //
    export class NodeDrawComponent implements IComponent {
      // ... //
      private DrawDebugInfo(): void {
        // --- ADD --- //
        if (!Settings.debugMode) {
          return
        }
        // --- ADD --- //
        // ... //
      }
    }
Vector2D Upgrade
Also, let’s update our Vector2d to provide a way to present itself as a string instead of doing this manually on the consumer level:
// src/utils/vector2D/vector2D.ts
    export class Vector2D {
      // ... //
      // --- ADD --- //
      public AsString(): string {
         return `(${this.x},${this.y})`
      }
      // --- ADD --- //
    }
And since we are in the neighborhood, let's support the opposite operation, the same way we did with Color a long time ago:
// src/utils/vector2D/vector2D.ts
    export class Vector2D {
      // ... //

      // --- ADD --- //
      public static FromString(str: string): Vector2D {
        const parsed = str.replace(new RegExp(/\(|\)/, 'g'), '').split(',')
        const x = Number(parsed[0])
        const y = Number(parsed[1])

        if (isNaN(x) || isNaN(y)) {
          throw new Error(`Cannot instantiate Vector2D from string ${str}`)
        }

        return new Vector2D(x, y)
      }
      // --- ADD --- //

      public AsString(): string {
         return `(${this.x},${this.y})`
      }
    }
And, of course, we support these new features with tests:
// src/utils/vector2D/vector2D.spec.ts
    import { Vector2D } from './vector2D'

    describe('>>> Vector2D', () => {
      describe('>> AsString', () => { })

      describe('>> GetFromString', () => { })
    })
The first one has only one test, simple verification that provided vector properly converts itself to the string:
// src/utils/vector2D/vector2D.spec.ts
    import { Vector2D } from './vector2D'

    describe('>>> Vector2D', () => {
      describe('>> AsString', () => {
        // --- ADD --- //
        it('should return stringified coordinates of the Vector2D', () => {
          expect(new Vector2D(0, 0).AsString()).toBe('(0,0)')
          expect(new Vector2D(5, 4).AsString()).toBe('(5,4)')
        })
        // --- ADD --- //
      })
      // ... //
    })
The second one has two cases. Optimistic scenario checks that Vector2D successfully instantiated from the string, assuming the string is of correct format:
// src/utils/vector2D/vector2D.spec.ts
    import { Vector2D } from './vector2D'

    describe('>>> Vector2D', () => {
      // ... //
      describe('>> GetFromString', () => {
        // --- ADD --- //
        it('should instantiate Vector2D by stringified value', () => {
          const point = Vector2D.FromString('(0,4)')
          expect(point.x).toBe(0)
          expect(point.y).toBe(4)
        })
        // --- ADD --- //
      })
    })
The error scenario validates if code throws an error if provided string is of wrong format:
// src/utils/vector2D/vector2D.spec.ts
    import { Vector2D } from './vector2D'

    describe('>>> Vector2D', () => {
      // ... //
      describe('>> GetFromString', () => {
        // ... //
        // --- ADD --- //
        it('should throw error if instantiation is impossible', () => {
          expect(() => Vector2D.FromString('0')).toThrow()
        })
    	// --- ADD --- //
      })
    })
Nice! Lets refactoring our draw component to use this new functionality:
// src/node/components/draw/draw.ts
    import { IComponent, Color } from '@/utils' // <--- CHANGE
    // ... //
    export class NodeDrawComponent implements IComponent {
      // ... //
      private DrawDebugInfo(): void {
        const entity = this.Entity
        CanvasLayer.Background.DrawText(
          `${entity.Index.x}, ${entity.Index.y}`, // <--- REMOVE
          entity.Index.AsString(), // <--- ADD
          entity.Start,
          new Color(255, 0, 0, 1)
        )}
      }
    }
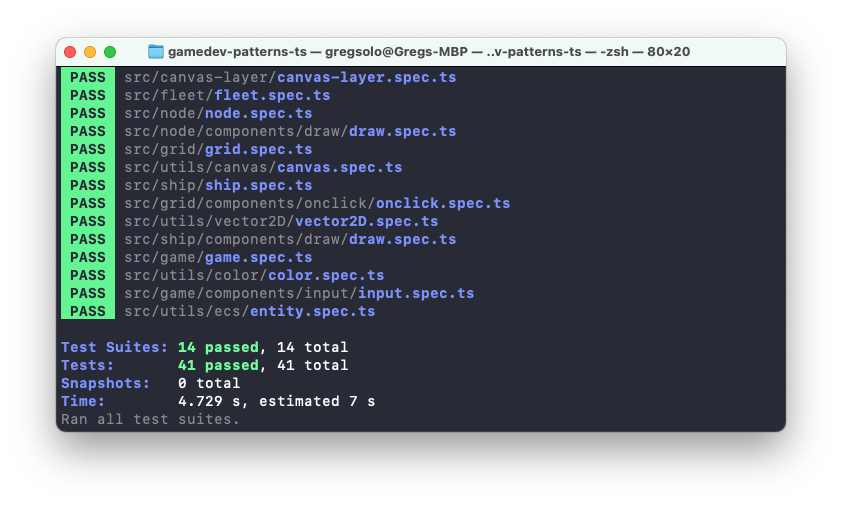
And that’s it! At this point, our code should successfully compile with npm start and all tests should pass with npm t:
You can find the complete source code of this post in the
movement-pathfinding-1branch of the repository.
Conclusion
This concludes our introduction to this Chapter. We have set up clear goals by describing the rules of the game when it comes to locomotion. We outlined the main technical challenges we need to overcome in this Chapter, as well as prepared a little debug tool which will help us implement new features with continuously increasing complexity.
Next time, we are looking to answer the first two questions of the technical list we established before: how can we find Nodes in a limited range around the Ship, as well as how and when to activate the Ship?
I would love to hear your thoughts! If you have any comments, suggestions, questions, or any other feedback, don’t hesitate to drop me a message on Twitter! If you enjoy this series, please share it with others. It helps me keep working on it. Thank you for reading, and I’ll see you next time!
This is Chapter VI in the series of tutorials "Building a game with TypeScript". Other Chapters are available here:
- Introduction
- Chapter I. Entities and Components
- Chapter II. Game loop (Part 1, Part 2)
- Chapter III. Drawing Grid (Part 1, Part 2, Part 3, Part 4, Part 5)
- Chapter IV. Ships (Part 1, Part 2, Part 3, Part 4)
- Chapter V. Input system (Part 1, Part 2,Part 3)
- Chapter VI. Pathfinding and Movement (Part 1, Part 2, Part 3, Part 4, Part 5, Part 6, Part 7)
- Chapter VII. State Machina
- Chapter VII. Attack System: Health and Damage
- Chapter IX. Winning and Losing the Game
- Chapter X. Enemy AI