Building a Game With TypeScript. Pathfinding and Movement 2/7. Highlighting Locomotion Range
Chapter VI in the series of tutorials on how to build a game from scratch with TypeScript and native browser APIs
- Greg Solo
- GameDev
- July 24 2022
- Share on LinkedIn

Navigation vector created by storyset - www.freepik.com
Welcome back, folks! Last time we prepared a foundation: discussed rules of locomotion and introduced hand-made debug tools. We will need them soon enough.
Before we start moving Ships around, we should configure the range of their movement. It would be too easy if our Ships could magically teleport from a very distant place (though, it can be a nice feature to have for some exclusive Ships).
There are many ways how we can set up a locomotion range. One of them is by introducing the idea of “neighbor”: a property of the Node that references all nearby Nodes. With this reference, it becomes very easy to determine range by recursively traversing neighbors until we hit the range boundary.
In Chapter VI “Pathfinding and Movement”, we finally make our Ships alive! You can find other Chapters of this series here:
- Introduction
- Chapter I. Entities and Components
- Chapter II. Game loop (Part 1, Part 2)
- Chapter III. Drawing Grid (Part 1, Part 2, Part 3, Part 4, Part 5)
- Chapter IV. Ships (Part 1, Part 2, Part 3, Part 4)
- Chapter V. Input system (Part 1, Part 2,Part 3)
- Chapter VI. Pathfinding and Movement (Part 1, Part 2, Part 3, Part 4, Part 5,Part 6, Part 7)
- Chapter VII. State Machina
- Chapter VII. Attack System: Health and Damage
- Chapter IX. Winning and Losing the Game
- Chapter X. Enemy AI
Feel free to switch to the
movement-pathfinding-1branch of the repository. It contains the working result of the previous posts and is a great starting point for this one.
Table of Contents
- Introduction
- Good Neighbors
- Highlighting Nodes
- Finding in Range
- Activating Ship
- Node with a Ship
- Conclusion
Good Neighbors
I'll start by adding the Neighbors property to the Node:
// src/node/node.ts
    // ... //
    export class Node extends Entity {
      // ... //
      constructor(
        public readonly Start: Vector2D,
        public readonly End: Vector2D,
        public readonly Index: Vector2D,
        public readonly Neighbors: Node[] // <--- ADD
      ) {
        super()
      }
      // ... //
    }
We never expect to change this property hence it is readonly. We also going to configure it once during construction and be done with it.
Now, when we construct all Nodes on the Grid we have to provide a promised array:
// src/grid/grid.ts
    // ... //
    export class Grid extends Entity {
      // ... //
      private InitNodes(): void {
        // ... //
        const index = new Vector2D(x, y)

        const neighbors: Node[] = [] // <--- ADD
        const node = new Node(start, end, index, neighbors) // <--- CHANGE
        this._nodes.push(node)
      }
    }
Good, but we can hardly benefit from an empty array. We have to determine what Nodes can be neighbors of any given Node. And our newly developed debug tool should help us visualize it. Let's pick any one Node as an example, let's say the one with the coordinates (2,2):

Let’s agree that by “neighbors” we understand Nodes that are directly connected to the chosen one. For Node (2,2) those are these blue ones:

Looks like Node (2,2) has 4 neighbors: one on its top, one on its right, one below, and one on the left. How can we programmatically recognize them? Our humble debug tool shows it quite clearly: we can use index (coordinate) of the Node and add or subtract 1 point to/from every dimension of it. So, for our “red” Node with index (2,2), neighbors are:
- top: (2,1), which is (2,2) - (0, 1)
- right: (3,2) which is (2,2) + (1, 0)
- bottom (2,3) which is (2,2) + (0, 1)
- left (1,2) which is (2,2) - (1, 0)
If you recall, we create Nodes progressively, starting from the top left corner. We can use this to our advantage to locate the top and left neighbors among nodes that were already generated:
// src/grid/grid.ts
    // ... //
    export class Grid extends Entity {
      // ... //

      private InitNodes(): void {
        // ... //
        const index = new Vector2D(x, y)

        // --- ADD --- //
        const top = this.Nodes.find(node => node.Index.x === index.x && node.Index.y === index.y - 1)
        const left = this.Nodes.find(node => node.Index.x === index.x - 1 && node.Index.y === index.y)
        // --- ADD --- //

        const neighbors: Node[] = []
        const node = new Node(start, end, index, neighbors)
        this._nodes.push(node)
      }
    }
Just as we discussed, I deduct 1 from the respective coordinate to locate the top
or left neighbor. But what about right and bottom? Well, we can pull a little trick.
There is a direct correlation between neighbors: if node A is a top neighbor of Node B it means that node B is a bottom neighbor of Node A. It may sound confusing, but let’s visualize it again:

Look at our red Node. It has a top neighbor, the blue Node. In turn, the blue Node has a bottom neighbor: the red Node. The same goes with relations left-right. Knowing this "mirror" relationship we can do something like this:
// src/grid/grid.ts
    // ... //
    export class Grid extends Entity {
      // ... //

      private InitNodes(): void {
        // ... //
        const index = new Vector2D(x, y)

        const top = this.Nodes.find(node => node.Index.x === index.x && node.Index.y === index.y - 1)
        const left = this.Nodes.find(node => node.Index.x === index.x - 1 && node.Index.y === index.y)

        const neighbors: Node[] = []
        const node = new Node(start, end, index, neighbors)

        // --- ADD --- //
        neighbors.push(left)
        left.Neighbors.push(node)

        neighbors.push(top)
        top.Neighbors.push(node)
        // --- ADD --- //
        this._nodes.push(node)
      }
    }
But TypeScript is nice enough to warn us about possible error: top and left are possibly undefined. While technically speaking compiler complaints only because Array.find can return undefined, it actually helps us catch an error in our logic. There is a possibility for top or left to be undefined and we can quickly visualize this scenario:

The very first Node, the one located under index (0,0) simply cannot have any top or left neighbors. Similarly, (0,2) has a top but does not have a left one. Node with index (2,0) has left neighbor but not top one. We could analyze this by checking negative coordinates but we can do even simpler:
// src/grid/grid.ts
    // ... //
    export class Grid extends Entity {
      // ... //

      private InitNodes(): void {
        // ... //
        const index = new Vector2D(x, y)

        const top = this.Nodes.find(node => node.Index.x === index.x && node.Index.y === index.y - 1)
        const left = this.Nodes.find(node => node.Index.x === index.x - 1 && node.Index.y === index.y)

        const neighbors: Node[] = []
        const node = new Node(start, end, index, neighbors)

        // --- CHANGE --- //
        if (left) {
          neighbors.push(left)
          left.Neighbors.push(node)
        }

        if (top) {
           neighbors.push(top)
           top.Neighbors.push(node)
        }
        // --- CHANGE --- //

        this._nodes.push(node)
      }
    }
It is sufficient to check the only existence of the top/left Nodes. If there is one, we will use them. Since we generate Nodes from the top left corner we guaranteed to have top or left Nodes if possible.
But compiler still argues that we are not done yet. Indeed, we have one more place to update: the mock. Fortunately, its a trivial change:
// src/node/node.mock.ts
    // ... //
    export const mockNodeFactory = (
      start = new Vector2D(0, 0),
      end = new Vector2D(1, 1),
      index = new Vector2D(0, 0),
      neighbors: Node[] = [], // <--- ADD
    ): Node => new Node(start, end, index, neighbors) // <--- CHANGE
This makes TypeScript happy again, great job! Now when neighbors are all set we can move on to the next part: the highlighting.
Highlighting Nodes
We have already used highlighting before. If you recall, we drew Nodes in a different color after the Player clicks them. In fact, we even have a color setup for us in the settings. We called all this active but let’s refactor it to something more meaningful:
// src/settings/settings.ts
    // ... //
    export const Settings = Object.freeze({
      grid: {
        dimension: 6,
        nodeSize: 100,
        nodeOffset: 10,
        color: {
          regular: new Color(245, 245, 245, 1),
          inLocomotionRange: new Color(176, 190, 197, 1) // <--- CHANGE
        }
      },
      // ... //
    }
Let’s preserve IsActive for now, we will clean it up soon too:
// src/node/node.ts
    // ... //
    export class Node extends Entity {
      /**
       * @todo replace temp property with real functionality
       */
      public IsActive = false
      public IsInLocomotionRange = false // <--- ADD

      // ... //
    }
And then update consumers on this setting:
// src/node/components/draw/draw.ts
    // ... //
    export class NodeDrawComponent implements IComponent {
      // ... //
      private Draw(): void {
        CanvasLayer.Background.FillRect(
          this.Entity.Start,
          this.Entity.Size,
          this.Entity.IsInLocomotionRange ? Settings.grid.color.inLocomotionRange : Settings.grid.color.regular // <--- CHANGE
        )
      }

      // ... //
    }
// src/node/components/draw/draw.spec.ts
    // ... //
    describe('>>> Node Draw Component', () => {
      // ... //
      it('should render range color if entity is in range and regular color otherwise', () => { // <--- CHANGE
        const spyFillRect = jest.spyOn(CanvasLayer.Background, 'FillRect')

        comp.Entity.IsInLocomotionRange = true // <--- CHANGE
        comp.Update(0)
        expect(spyFillRect).toBeCalledWith(comp.Entity.Start, comp.Entity.Size, Settings.grid.color.inLocomotionRange) // <--- CHANGE

        comp.Entity.IsInLocomotionRange = false // <--- CHANGE
        comp.Update(0)
        expect(spyFillRect).toBeCalledWith(comp.Entity.Start, comp.Entity.Size, Settings.grid.color.regular)
      })
    })
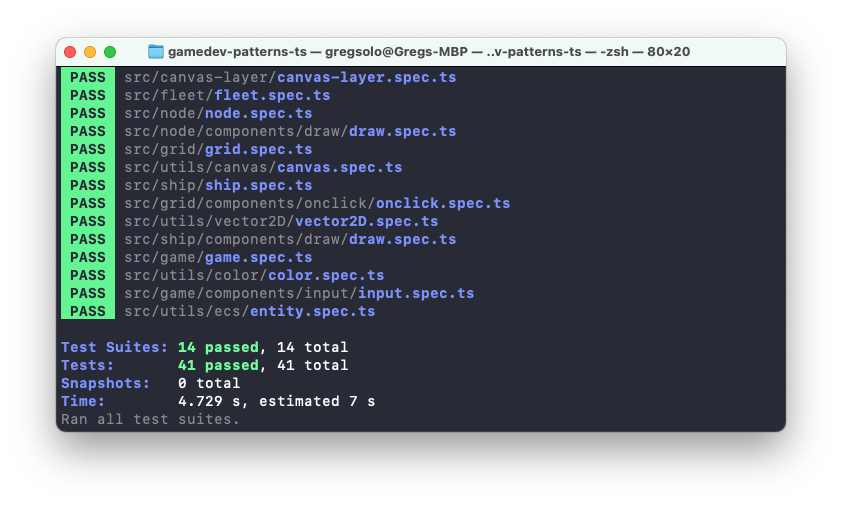
At this point, our code should successfully compile with npm start and all test should pass with npm t. Nice!
Finding in range
Now, with the help of neighbors we can easily look up for all of them that are in range:
// src/node/node.ts
    // ... //
    export class Node extends Entity {
      // ... //

      // --- ADD --- //
      public FindAndSetInLocomotionRange(range: number): void {}
      // --- ADD --- //
    }
First, we highlight the current Node, which is a “center”
// src/node/node.ts
    // ... //
    export class Node extends Entity {
      // ... //

      public FindAndSetInLocomotionRange(range: number): void {
        this.IsInLocomotionRange = true // <--- ADD
      }
    }
And then recursively repeat for all neighbors until we reach the range:
// src/node/node.ts
    // ... //
    export class Node extends Entity {
      // ... //


      public FindAndSetInLocomotionRange(range: number): void {
        this.IsInLocomotionRange = true

        // --- ADD --- //
        const newRange = --range
        if (newRange <= 0) {
          return
        }

        this.Neighbors
          .map(neighbor => neighbor.FindAndSetInLocomotionRange(range))
        // --- ADD --- //
      }
    }
Before we go any further, it's a good idea to cover this code with some tests:
// src/node/node.spec.ts
    // ... //
    describe('>>> Node', () => {
      // ... //
      // --- ADD --- //
      it('should find and set inLocomotionRange', () => { })
      // --- ADD --- //
    })
First, we need some neighbors:
// src/node/node.spec.ts
    // ... //
    describe('>>> Node', () => {
      const start = new Vector2D(1, 2)
      const end = new Vector2D(5, 6)

      // --- ADD --- //
      const index = new Vector2D(1, 1)
      const neighborTop = mockNodeFactory(new Vector2D(1, 0))
      const neighborRight = mockNodeFactory(new Vector2D(1, 0))
      const neighborBottom = mockNodeFactory(new Vector2D(1, 0))
      const neighborLeft = mockNodeFactory(new Vector2D(1, 0))

      const neighbors = [
        neighborTop,
        neighborRight,
        neighborBottom,
        neighborLeft,
      ]
      // --- ADD --- //
      let node: Node

      beforeEach(() => {
        node = mockNodeFactory(start, end, index, neighbors) // <--- CHANGE
      })
We simply create neighbors on all sides of the tested Node. With that in place we can verify if they indeed have been highlighted:
// src/node/node.spec.ts
    // ... //
    describe('>>> Node', () => {
      //  ... //
      it('should find and set inLocomotionRange', () => {
        // --- ADD --- //
        expect(neighborTop.IsInLocomotionRange).toBeFalsy()
        expect(neighborRight.IsInLocomotionRange).toBeFalsy()
        expect(neighborBottom.IsInLocomotionRange).toBeFalsy()
        expect(neighborLeft.IsInLocomotionRange).toBeFalsy()
        node.FindAndSetInLocomotionRange(2)
        expect(neighborTop.IsInLocomotionRange).toBeTruthy()
        expect(neighborRight.IsInLocomotionRange).toBeTruthy()
        expect(neighborBottom.IsInLocomotionRange).toBeTruthy()
        expect(neighborLeft.IsInLocomotionRange).toBeTruthy()
        // --- ADD --- //
      })
    })
The approach should be familiar, we did a similar thing a few times before. First, we check that neighbors are in the initial state, aka not highlighted. Then, after invoking node.FindAndSetInLocomotionRange they should be.
At this point, our code should successfully compile with npm start and all test should pass with npm t:

Activating Ship
Great, but when exactly should we highlight nodes in the range? It doesn't make sense to always highlight because Ships not always can move. If you recall, the player can move only one Ship at a time and, of course, they cannot move the enemy’s Ships. To make this logic possible let’s introduce the concept of “active” Ship. We will talk a lot about what “active” Ship can and cannot do when we will start building a state machine for it. The only thing that matters to us now is that a) Ship can be active and b) when it is, we highlight locomotion range.
First is achievable by simply introducing a new field:
// src/ship/ship.ts
    // ... //
    export class Ship extends Entity {
      private readonly _locomotionComponent: ShipLocomotionComponent

      // --- ADD --- //
      private _isActive = false

      public get IsActive(): boolean {
        return this._isActive
      }
      // --- ADD --- //
    }
The second is also simple enough. As soon as any particular Ship becomes active, we should invoke node.FindAndSetInLocomotionRange, where node is the current position of the Ship:
// src/ship/ship.ts
    // ... //
    export class Ship extends Entity {
      private readonly _locomotionComponent: ShipLocomotionComponent
      private _isActive = false;

      public get IsActive(): boolean {
        return this._isActive
      }

      // --- ADD --- //
      public set IsActive(v: boolean) {
        this._isActive = v

        if (v) {
          this._locomotionComponent.Node.FindAndSetInLocomotionRange(2)
        }
      }
      // --- ADD --- //
    }
TypeScript righteously complains that there is a possibility for node to be null. Indeed, the way we set up the locomotion component it surely can contain an empty node. We can fix this compiler error by introducing an additional check but I suggest we simplify our lives and assume that as long as Ship exists, it always stands on some node.
To achieve that we have to refactor a bit, starting with the locomotion component. First, we can make its constructor expect the Node:
// src/ship/components/locomotion/locomotion.ts
    // ... //
    export class ShipLocomotionComponent implements IComponent {
      // ... //
      public get Position(): Vector2D | null {
        return this.Node ? this.Node.Center : null
      }

      // --- ADD --- //
      constructor(node: Node) {
        this.Node = node
      }
      // --- ADD --- //
      // ... //
    }
This way we store Node as soon as the component gets constructed. This opens doors for removing the null check in the component itself:
// src/ship/components/locomotion/locomotion.ts
    // ... //
    export class ShipLocomotionComponent implements IComponent {
      public Entity: Ship

      private _node: Node // <--- CHANGE

      public get Node(): Node { // <--- CHANGE
        return this._node
      }

      public set Node(v: Node) { // <--- CHANGE
        this._node = v
      }

      public get Position(): Vector2D { // <--- CHANGE
        return this.Node.Center // <--- CHANGE
      }

      constructor(node: Node) {
        this.Node = node
      }

      // ... //
    }
And makes code a little bit cleaner. We also have to fix the missing node in the Ship where we construct the component. Effectively, instead of assigning node to a field, we supply it directly to the constructor:
// src/ship/ship.ts
    // ... //
    export class Ship extends Entity {
      // ... //
      constructor(public readonly Factory: Fleet, node: Node) {
        super()

        this._locomotionComponent = new ShipLocomotionComponent(node) // <--- CHANGE
        this._locomotionComponent.Node = node // <--- REMOVE
      }
      // ... //
    }
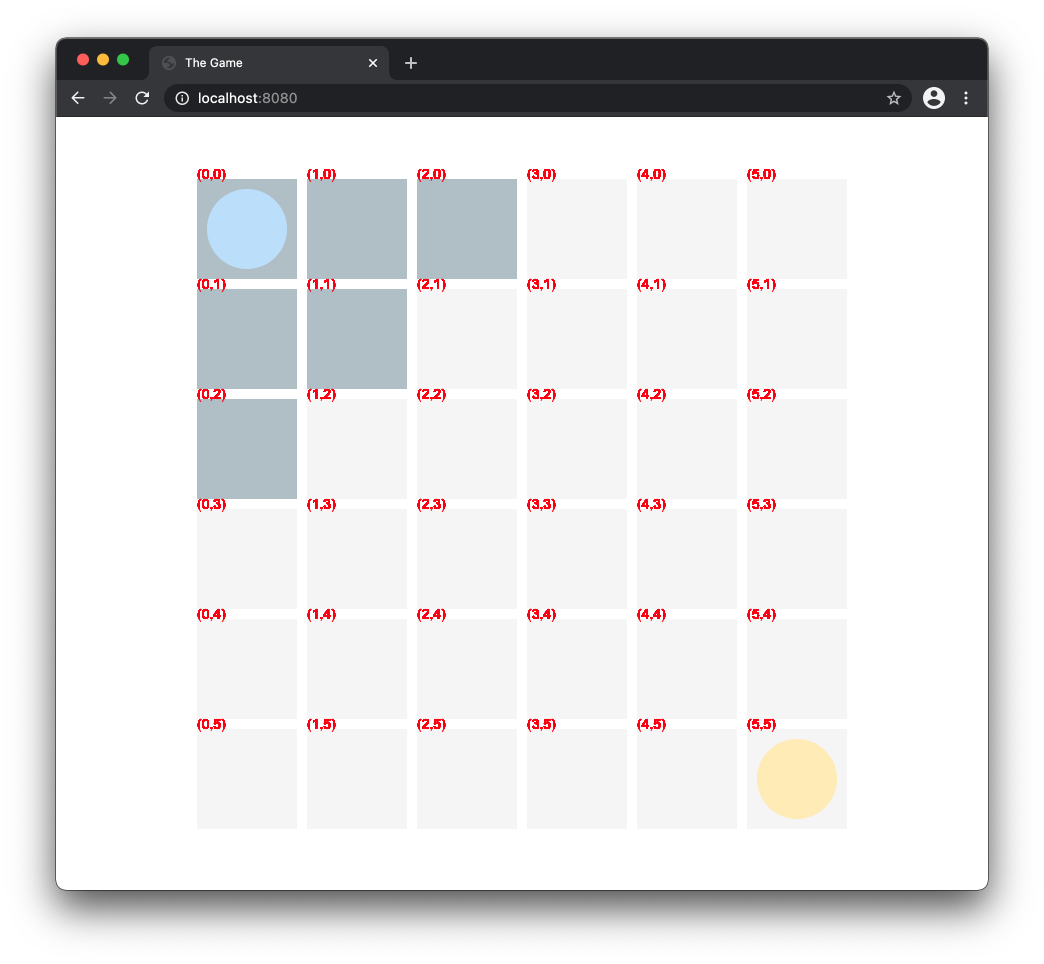
Great! Now we can activate the Ship. Again, we are not bothered for now with all the interesting logic “why” and “when” Ship gets activated. Let’s just hardcode that the very first Ship of the player’s fleet is activated when the fleet is constructed:
// src/fleet/fleet.ts
    // ... //
    export class Fleet extends Entity {
      // ... //
      private PrepareShips(): void {
        // ... //
        // --- ADD --- //
        // @todo start with state machine
        if (this.Team === Team.A) {
          this._ships[0].IsActive = true
        }
        // --- ADD --- //
      }
    }
And that’s it! As soon as we have done this we should see the highlighted nodes in the range:

Before we go any further, there is something that bugs me. If you have noticed, we’ve been hardcoding the range value all this time. Ideally, we want this to be customizable and decoupled from the code. Fortunately, we have a perfect place for that:
// src/settings/settings.ts
    export const Settings = Object.freeze({
      // ... //
      ships: {
        // ... //
        colors: {
          a: new Color(187, 222, 251, 1),
          b: new Color(255, 236, 179, 1)
        },
        // --- ADD --- //
        locomotion: {
          range: 3,
          duration: 300
        },
      },
    })
Here I added a dedicated section for the Ship's locomotion settings. For now, we have only two: range and duration. We don’t need the latter right now but we will soon enough.
Now, we can use this setting:
// src/ship/ship.ts
    // ... //
    import { Node } from '@/node'
    import { Settings } from '@/settings' // <--- ADD

    export class Ship extends Entity {
      // ... //
      public set IsActive(v: boolean) {
        this._isActive = v

        if (v) {
          this._locomotionComponent.Node.FindAndSetInLocomotionRange(Settings.ships.locomotion.range) // <--- CHANGE
        }
      }
    }
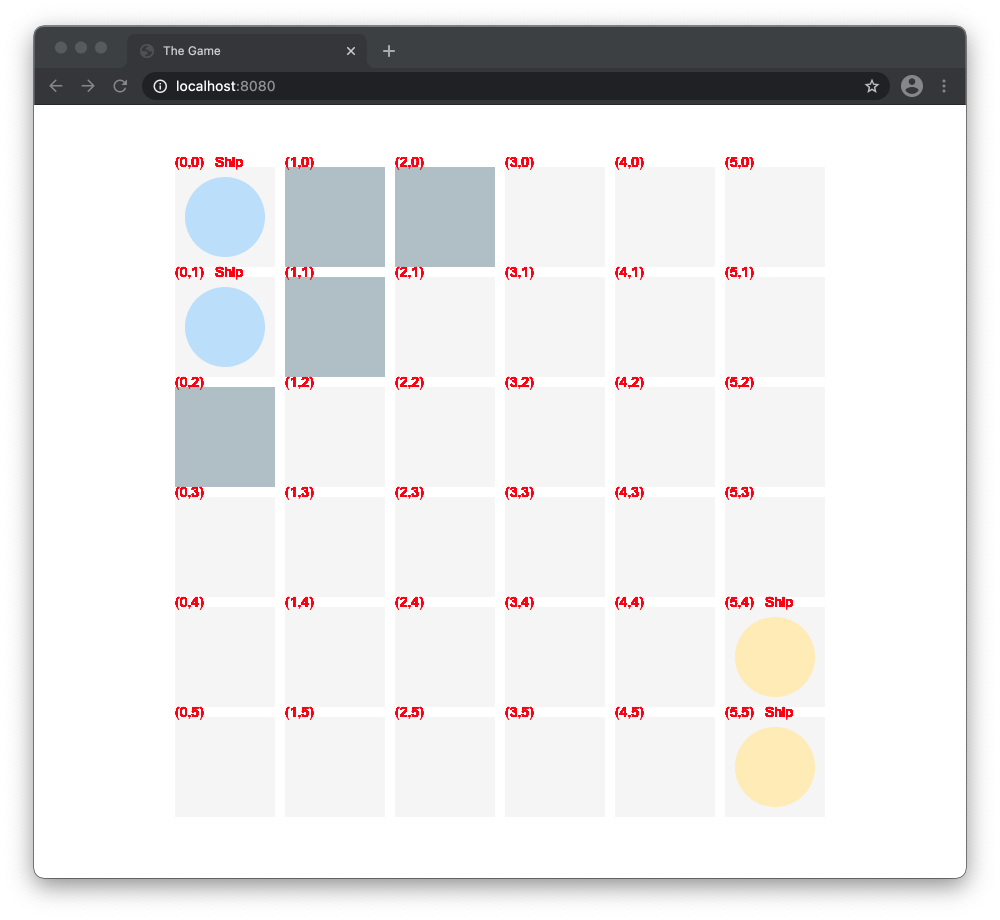
Code should still compile, the test should still pass and our game should now look like this:

Great but you may notice that something is slightly off. Node under Ship itself is highlighted too. That is definitely a mistake because we cannot locomote to the node if it is already occupied. To solve this mystery we can make Node to be aware of Ship occupies it.
Node with a Ship
That's right, we add one more field to the Node entity:
// src/node/node.ts
    import { Ship } from '@/ship' // <--- ADD
    import { Entity, Vector2D } from '@/utils'
    // ... //
    export class Node extends Entity {
      // ... //
      public IsActive = false
      public Ship: Ship | null = null // <--- ADD
      public IsInLocomotionRange = false
      // ... //
    }
Unlike Ship, a Node can easily exist without any resident, hence Ship field is null by default. Having this property in place, we can rely on it to check locomotion range:
// src/node/node.ts
    // ... //
    export class Node extends Entity {
      // ... //
      public FindAndSetInLocomotionRange(range: number): void {
        // --- ADD --- //
        if (!this.Ship) {
          this.IsInLocomotionRange = true
        }
        // --- ADD --- //

        this.IsInLocomotionRange = true  // <--- REMOVE
        // ... //
      }
    }
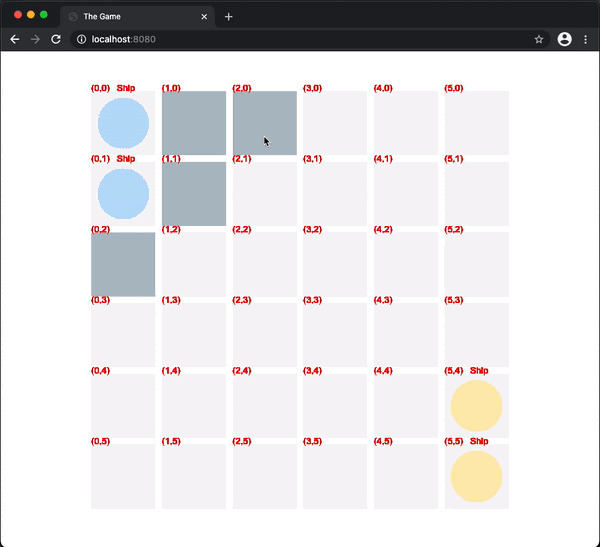
That doesn't work out of the shelf: occupied Node (0,0) is still highlighted:

To figure out what is wrong we can summon help of our little debug tool once more:
// src/node/components/draw/draw.ts
    import { IComponent, Color, Vector2D } from '@/utils' // <--- CHANGE
    // ... //
    export class NodeDrawComponent implements IComponent {
      // ... //
      private DrawDebugInfo(): void {
        // ... //
        // --- ADD --- //
        if (this.Entity.Ship) {
          CanvasLayer.Background.DrawText(
            'Ship',
            new Vector2D(entity.Start.x + 40, entity.Start.y),
            new Color(255, 0, 0, 1)
          )
        }
        // --- ADD --- //
      }
    }
What happens here? I simply ask DrawDebugInfo to render one more piece of debug information: text “Ship” if this Node is aware of the presence of some Ship on it. Apparently, Node (0,0) is not aware because we see no extra text:
This happens because… well, we never assigned this field with a value. We should set it as soon as Ship “lands” on “Node”:
// src/ship/components/locomotion/locomotion.ts
    // ... //
    export class ShipLocomotionComponent implements IComponent {
      // ... //
      public set Node(v: Node) {
        this._node = v
        this._node.Ship = this.Entity // <--- ADD
      }
      // ... //
    }
Aaaaand that does not work. If we debug this. Entity right after this._node.Ship = this.Entity we can see something peculiar: it’s undefined!
// src/ship/components/locomotion/locomotion.ts
    // ... //
    export class ShipLocomotionComponent implements IComponent {
      // ... //
      public set Node(v: Node) {
        this._node = v
        this._node.Ship = this.Entity
        console.log(this.Entity) // <--- ADD
      }
      // ... //
    }

How is that possible? Isn’t Entity suppose to be always available? Well, yes. After it gets constructed. This setter fires because we set Node in the ShipLocomotionComponent constructor:
// src/ship/components/locomotion/locomotion.ts
    // ... //
    export class ShipLocomotionComponent implements IComponent {
      // ... //
      constructor(node: Node) {
        this.Node = node // <--- this guy
      }
      // ... //
    }
Which, in turn, is called within Ship's constructor:
// src/ship/ship.ts
    // ... //
    export class Ship extends Entity {
      // ... //
      constructor(public readonly Factory: Fleet, node: Node) {
        super()

        this._locomotionComponent = new ShipLocomotionComponent(node) // <--- this guy
      }

      // ... //
    }
So, technically speaking, Ship has not been constructed yet. Fortunately for us, we have a separate lifecycle event that fires after both component and entity have been instantiated: Awake. Let us use the power of our humble entity/component architecture to solve this issue:
// src/ship/components/locomotion/locomotion.ts
    // ... //
    export class ShipLocomotionComponent implements IComponent {
      public set Node(v: Node) {
        this._node = v
        this._node.Ship = this.Entity
        console.log(this.Entity) // <--- REMOVE
      }

      // ... //

      constructor(node: Node) {
        this._node = node
      }

      public Awake(): void {
        /* @todo */ // <--- REMOVE
        this._node.Ship = this.Entity // <--- ADD
      }
    }
Notice, that I bypass setter by directly assigning this._node instead of this.Node = node. We know for sure that there is no entity yet, so no need to trouble the setter yet. But when in future Ship will change its position (read: change its Node) setter will automatically update Node with the reference to this Ship.
Note: We also need to clean up after changing position and we will get there in the next installments
And our hard work was rewarded:

Debug tools now show proper “Ship” text and occupied Node is not highlighted. Nice, but we have one nasty edge case. To illustrate it, let me temporary increase amount of Ships in the player’s fleet:
// src/settings/settings.ts
    // ... //
    export const Settings = Object.freeze({
      // ... //
      ships: {
        fleetSize: 2, // <--- CHANGE
        // ... //
      }
    })
The game now looks like this:
Did you notice anything suspicious? Let's stop for a second and think about what we see. We set up our locomotion range to be 3. That means, Ship can move up to two Nodes ahead. Something like this:
Notice, that Ship moves through 2 Nodes, step by step. This is also true if it moves diagonally:
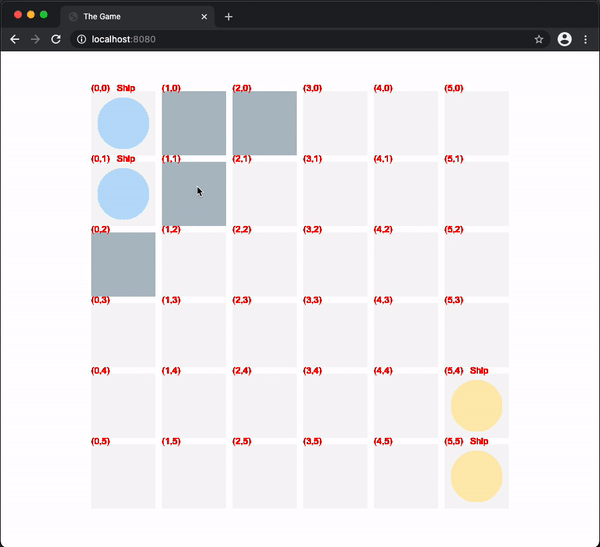
This works because all Nodes are in a range of up to 2 steps. But what about that one with the index (0,2):
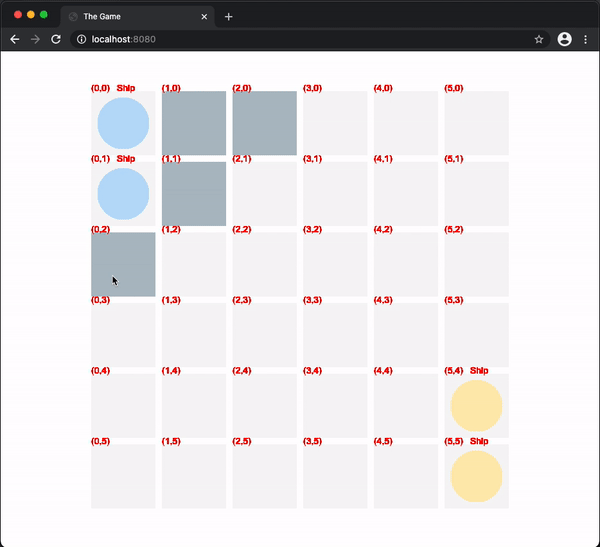
Oops! To get there Ship has to do one extra step. We don’t want this to happen. Fortunately, all we have to do to fix this is to exclude occupied Nodes from consideration for highlighting (as we did already) and from the traversed list:
// src/node/node.ts
    // ... //
    export class Node extends Entity {
      // ... //
      public FindAndSetInLocomotionRange(range: number): void {
        // ... //

        this.Neighbors
          .filter(neighbor => !neighbor.Ship) // <--- ADD
          .map(neighbor => neighbor.FindAndSetInLocomotionRange(range))
      }

    }
And now we don’t have this “leftover” anymore:

Finally, let’s get back to one Ship in the fleet, it would be easier for us for a while:
// src/settings/settings.ts
    // ... //
    export const Settings = Object.freeze({
      // ... //
      ships: {
        fleetSize: 1, // <--- CHANGE
        // ... //
      }
    })
Great job! At this point, our code should successfully compile with npm start and all test should pass with npm t:
You can find the complete source code of this post in the
movement-pathfinding-2branch of the repository.
Conclusion
Phew! This was a long article but I hope you enjoyed it! We wrote a lot of code this time and should be proud of ourselves! First, we introduced the notion of “neighbors” of the Node: link to a bordering Nodes which we then used to traverse and highlight all Nodes in a specific, configurable range. We added Ship to the Node so the latter has a chance to know if it's occupied now by any Ship. We use debug tools to display if Node is indeed aware of the presence of the Ship. We also refactored ShipLocomotionComponent to always have a reference to the Node. And finally, introduced the concept of an ”active” Ship.
All in all, we have a solid functionality for highlighting the locomotion range. Next time we are going to use these highlighted Nodes to find a path for Ship to move. Time to talk about pathfinding algorithms!
I would love to hear your thoughts! If you have any comments, suggestions, questions, or any other feedback, don’t hesitate to send me a message on Twitter or email! If you enjoy this series, please share it with others. It really helps me keep working on it. Thank you for reading, and I’ll see you next time!
This is Chapter N in the series of tutorials "Building a game with TypeScript". Other Chapters are available here:
- Introduction
- Chapter I. Entities and Components
- Chapter II. Game loop (Part 1, Part 2)
- Chapter III. Drawing Grid (Part 1, Part 2, Part 3, Part 4, Part 5)
- Chapter IV. Ships (Part 1, Part 2, Part 3, Part 4)
- Chapter V. Input system (Part 1, Part 2,Part 3)
- Chapter VI. Pathfinding and Movement (Part 1, Part 2, Part 3,Part 4, Part 5, Part 6, Part 7)
- Chapter VII. State Machina
- Chapter VII. Attack System: Health and Damage
- Chapter IX. Winning and Losing the Game
- Chapter X. Enemy AI